Connecting a kitchen sink drain is a manageable task that can be accomplished with the right tools and a systematic approach. Here’s a step-by-step guide to help you through the process:
1. Gather Necessary Tools and Materials
Before starting, ensure you have the following items:
- Adjustable Wrench: For tightening nuts and bolts.
- Pipe Cutter: To cut pipes to the required length.
- Plumber’s Putty: Creates a watertight seal between the drain and sink.
- P-Trap Assembly: Essential for preventing sewer gases from entering your home.
- Tailpiece: Connects the sink drain to the P-trap.
- Slip Nuts and Washers: Secure connections between pipes.
- Bucket: To catch any residual water during the process.
2. Prepare the Sink Drain
- Apply Plumber’s Putty: Roll a small amount of plumber’s putty into a rope and place it around the sink drain hole. This ensures a watertight seal when the drain is installed.
3. Install the Drain Assembly
- Insert the Drain: Place the drain assembly into the sink hole, pressing down firmly to compress the putty and create a seal.
- Secure the Drain: From beneath the sink, slide the rubber gasket and friction ring onto the drain’s threaded base. Then, screw on the locknut, tightening it with an adjustable wrench to secure the drain in place.
4. Connect the Tailpiece
- Attach the Tailpiece: Connect the tailpiece to the drain assembly, ensuring it’s properly aligned. Tighten the connection with a wrench, but avoid overtightening to prevent damage.
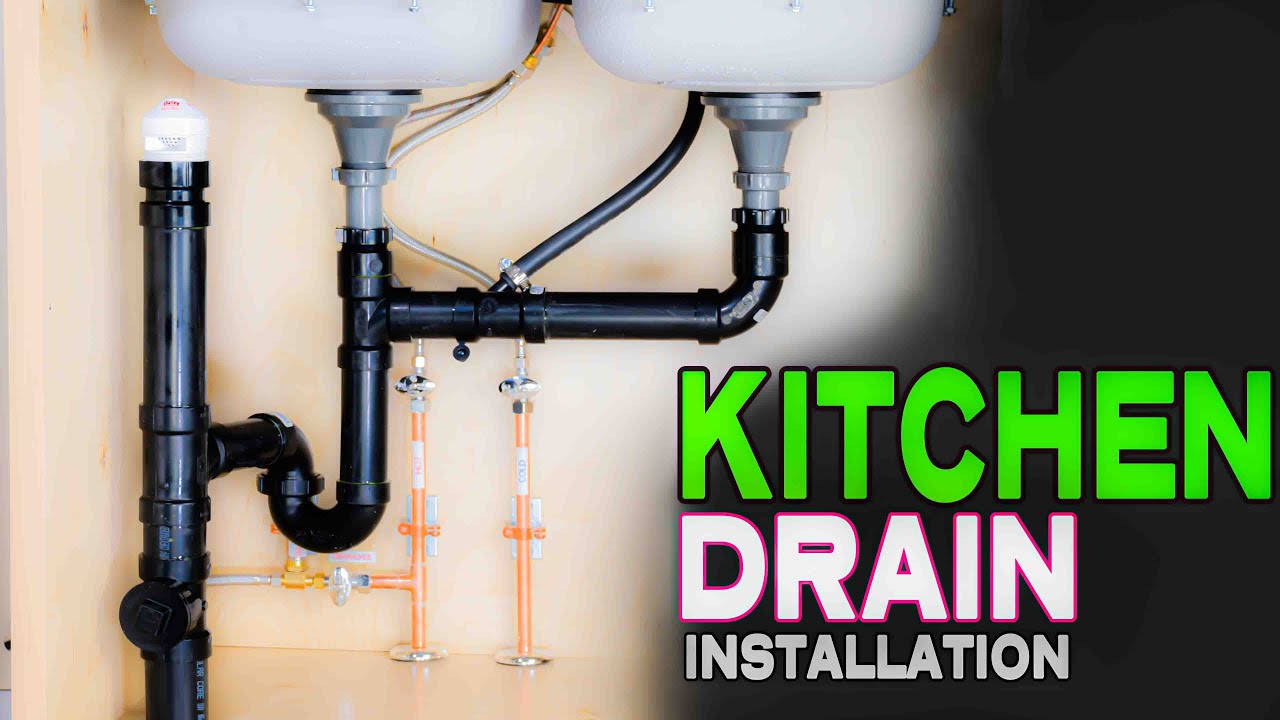
5. Install the P-Trap
- Position the P-Trap: Attach the P-trap to the tailpiece, ensuring it hangs directly below the drain.
- Connect to Waste Line: Align the other end of the P-trap with the home’s waste line.
- Secure Connections: Use slip nuts and washers to connect the P-trap to both the tailpiece and waste line. Tighten these connections with a wrench, ensuring a snug fit without overtightening.
6. Test for Leaks
- Run Water: Slowly turn on the faucet and let water flow into the sink.
- Check for Leaks: Inspect all connections for any signs of leakage. If leaks are present, tighten the corresponding connections slightly until the leak stops.
7. Final Adjustments
- Clean Excess Putty: Wipe away any excess plumber’s putty from around the drain.
- Ensure Proper Alignment: Confirm that all pipes are properly aligned and securely connected.
By following these steps, you can successfully connect your kitchen sink drain, ensuring efficient drainage and preventing potential leaks.
For a visual demonstration of this process, you might find the following video helpful: