How to Plumb a Bathroom (With Free Plumbing Diagrams)
Plumbing a bathroom is one of the most critical aspects of home construction or renovation. Whether you’re a DIY enthusiast or a professional plumber, understanding the proper layout and installation of a bathroom’s Drain, Waste, and Vent (DWV) system, as well as its water supply lines, is essential for ensuring smooth operation and compliance with building codes.
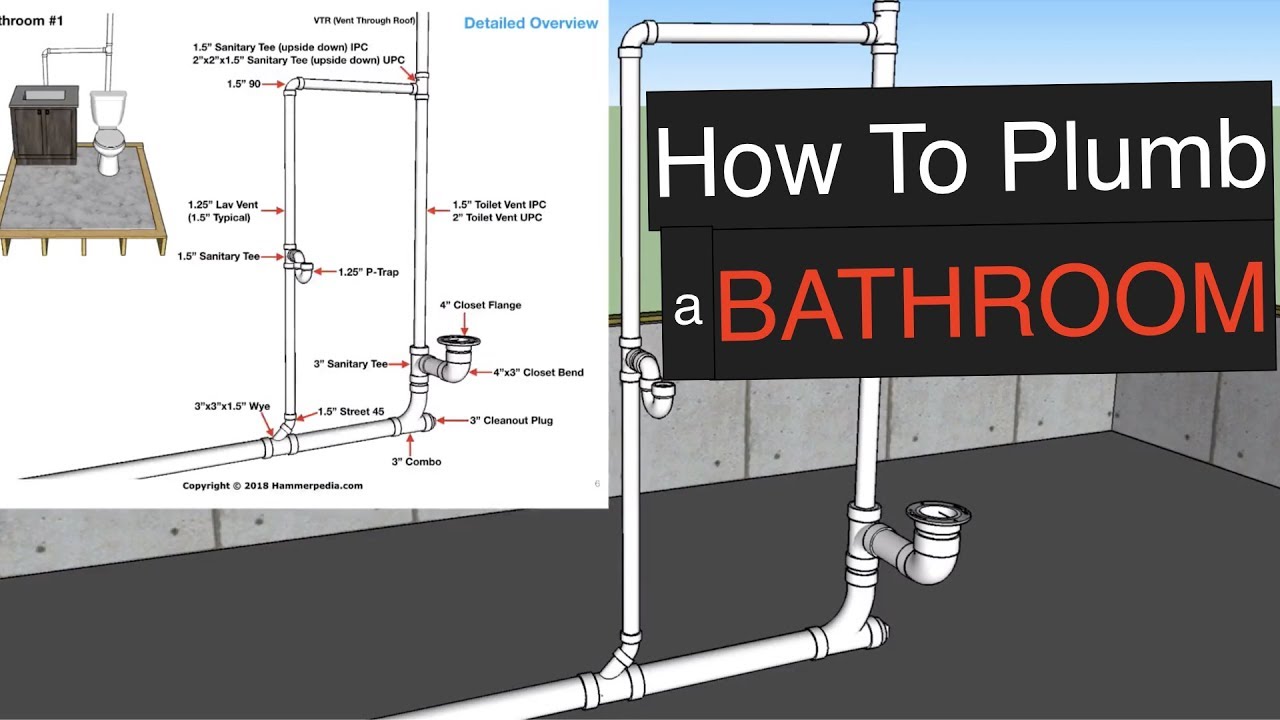
In this guide, we’ll walk you through the step-by-step process of plumbing a bathroom, including fixture placement, pipe sizing, venting, and best practices—with free plumbing diagrams to help visualize the layout.
1. Understanding the Bathroom Plumbing System
A bathroom plumbing system consists of two primary systems:
- Water Supply System – Brings in freshwater to fixtures like sinks, toilets, and showers.
- Drain-Waste-Vent (DWV) System – Removes wastewater and sewage while allowing air to flow to maintain proper drainage.
Each fixture (toilet, sink, shower, bathtub) needs a dedicated drain line, venting, and water supply lines.
2. Bathroom Plumbing Diagram – Overview
A standard bathroom plumbing layout includes:
✔ Toilet Drain (3″ or 4″) connected to the main stack.
✔ Shower/Bathtub Drain (1.5″ to 2″) with a P-trap.
✔ Sink Drain (1.5″) with a vent pipe.
✔ Water supply lines (½” hot & cold) running to each fixture.
✔ Vent pipes (1.5″ to 2″) ensuring smooth drainage.
(Refer to the provided free plumbing diagram for visual guidance.)
3. Step-by-Step Guide to Plumbing a Bathroom
Step 1: Plan Your Bathroom Layout
Before installing pipes, plan where each fixture will go and how they will connect to the main stack. The key elements include:
- Toilet placement (should be close to the main stack for proper drainage).
- Sink positioning (ensure proper venting).
- Shower/Bathtub location (needs a dedicated trap and vent).
💡 Tip: Keep all fixtures as close as possible to minimize pipe runs and improve efficiency.
Step 2: Install the Drain and Waste Pipes
The drain system removes wastewater and connects to the home’s main sewer line.
✔ Toilet Drain: Use a 3-inch or 4-inch PVC pipe sloped at ¼” per foot toward the main drain.
✔ Shower/Bathtub Drain: Requires a 1.5″ to 2″ drain pipe with a P-trap to prevent sewer gas.
✔ Sink Drain: Uses a 1.5″ drain pipe with a P-trap.
(See plumbing diagram for pipe sizes and slope requirements.)
💡 Tip: Always include a cleanout in the drain system for future maintenance.
Step 3: Install Vent Pipes
Vents prevent airlocks and help drains flow freely. Every fixture needs venting!
✔ Toilet: Connects to a 2-inch vent pipe running through the roof or tied into a larger vent.
✔ Sink and Shower: Use 1.5-inch vents, which can be tied into a shared vent system.
(Refer to the venting diagram for best practices.)
💡 Tip: Keep vent pipes as straight as possible to prevent clogs.
Step 4: Install the Water Supply Lines
Bathroom fixtures need hot and cold water lines (typically ½-inch PEX or copper pipes).
✔ Toilet: Needs only cold water (½-inch supply line).
✔ Sink: Requires both hot and cold (½-inch each).
✔ Shower/Bathtub: Needs both hot and cold lines, often in ¾-inch size for better water pressure.
💡 Tip: Use PEX tubing for easy, flexible installation.
Step 5: Test the System Before Closing Walls
After installation, check for leaks, proper drainage, and venting:
✔ Run water through all drains and check for slow drainage.
✔ Use a smoke or air test to verify venting.
✔ Inspect for leaks in supply lines before sealing walls.
Conclusion
Plumbing a bathroom requires careful planning, proper pipe sizing, and correct venting to ensure everything functions smoothly. By following this step-by-step guide and referencing the free plumbing diagrams, you can confidently install or upgrade your bathroom plumbing system.
✅ Plan fixture placement wisely
✅ Ensure proper slope for drain pipes
✅ Vent all fixtures to prevent sewer gas issues
✅ Use correct pipe sizes for supply and drainage
✅ Test everything before closing the walls
With these best practices in place, your bathroom will have efficient drainage, strong water pressure, and long-lasting performance! 🚿🚽